
Yoda’s ownCloud Installation on Kubuntu 20.04 Tutorial
Hi welcome to Yoda’s ownCloud installation on Kubuntu 20.04 tutorial.
Before we begin lets make sure we have what we need
- A Drink – it would be best if it was of the none alcoholic variety.
- If your a smoker make sure you have a smoke to hand.
- Some free time
- You have set your server to always have the same ip address in your router configuration page
Disclaimer
This is not a problem if you do not expose your server to the internet if you do please Enable the Proper Security Measures.
If you choose to expose your media server to the internet without using the proper Security Measures you do so at Your Own RISK .
Enabling the above mentioned security measures is out of the scope of this tutorial as this is for a sever operating with the ports 22 and 3306 not been exposed to the internet.
I don't accept any responsibility or liability for any damage caused by something going wrong.
In this Tutorial you will learn the following things:
- How to Mount Storage drives and add bindings in your fstab file
- How to install and configure SSH
- How to install Apache2and configure Modules for Apache2
- How to install PHP 7.3
- How to install and configure Mysql 8.0
- How to install and configure ownCloud 10.4.1
- How to Use a external Mysql library database in Kodi (including creating a advancedsettings.xml and importing it into Kodi)
- how to add our ownCloud share in Kodi
with that out of the way lets begin. Spin up a fresh install of kubuntu-20.04-desktop-amd64, and we shall begin.
Setting-Up the Base System
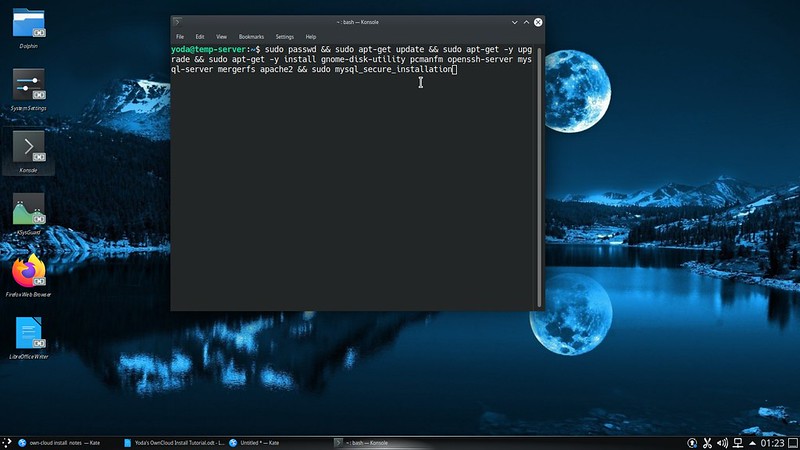
Open a terminal and type or copy and paste the following.
You will be prompted for your password and to set a new password for the root account.Once the updates have installed you will be prompted to set a root password for the mysql server.
You will be asked if you want to use the “Would you like to setup VALIDATE PASSWORD component?”press n

It may seem insecure to not use it but I found it causes problems.
You will then be asked if you wish to Remove anonymous users press y

You will then be asked if you wish to disallow remote root logins press y
You will then be asked if you wish to remove test database press y

You will then be asked if you wish to Reload the privilege tables press y

Then reboot your system.
Once your system has rebooted allow SSH,MYSQL and Apache though the Firewall using the below command.

Once that’s done were going to make a few folders for our storage disks to be mounted in and one for a merged disk pool as-well as a folder for the shared media.
So change to /mnt

Then make a disks folder then change to disks

Then make a folder for each storage drive you have. In my case I have 2 drives so I make folder A and folder B


Change back to /mnt and make a folder called pool

Then change back to your root directory
Make a folder called cloud

Change to cloud and make a media directory
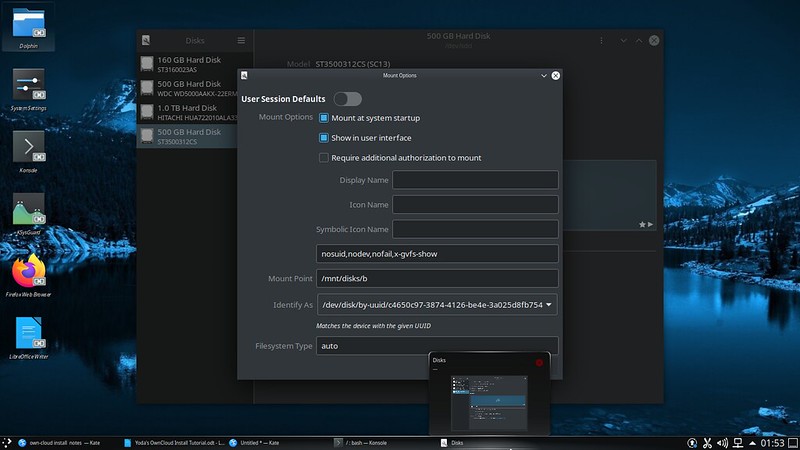
Auto-Mount Storage Drives on system Boot
Fire up Gnome Disk Utility And edit the mount options for your storage drive like in the screen-shots below.

Then we edit our fstab file

Insert this line
At the end of the file see screenshot below

Then add bindings so your media share will be read-only so any guests don't upload anything without your permission when you want to add media add your media to the folders in /mnt/pool.
Code:
sudo passwd && sudo apt-get update && sudo apt-get -y upgrade && sudo apt-get -y install gnome-disk-utility pcmanfm openssh-server mysql-server apache2 && sudo mysql_secure_installation
You will be prompted for your password and to set a new password for the root account.Once the updates have installed you will be prompted to set a root password for the mysql server.
You will be asked if you want to use the “Would you like to setup VALIDATE PASSWORD component?”press n
It may seem insecure to not use it but I found it causes problems.
You will then be asked if you wish to Remove anonymous users press y
You will then be asked if you wish to disallow remote root logins press y
You will then be asked if you wish to remove test database press y
You will then be asked if you wish to Reload the privilege tables press y
Then reboot your system.
Code:
sudo ufw allow ssh && sudo ufw allow apache && sudo ufw allow 3306
Once that’s done were going to make a few folders for our storage disks to be mounted in and one for a merged disk pool as-well as a folder for the shared media.
So change to /mnt
Code:
cd /mnt
Then make a disks folder then change to disks
Code:
sudo mkdir disks

cd disks
Then make a folder for each storage drive you have. In my case I have 2 drives so I make folder A and folder B
Code:
sudo mkdir a

sudo mkdir b
Change back to /mnt and make a folder called pool
Code:
cd /

cd /mnt
Code:
sudo mkdir pool
Then change back to your root directory
Code:
cd /
Code:
sudo mkdir cloud
Change to cloud and make a media directory
Code:
cd /cloud
Code:
sudo mkdir media
Auto-Mount Storage Drives on system Boot
Fire up Gnome Disk Utility And edit the mount options for your storage drive like in the screen-shots below.
Then we edit our fstab file
Code:
sudo nano etc/fstab
Insert this line
Code:
/mnt/disks/a:/mnt/disks/b: /mnt/pool/ fuse.mergerfs defaults,allow_other,use_ino,fsname=mergerFS 0 0
Then add bindings so your media share will be read-only so any guests don't upload anything without your permission when you want to add media add your media to the folders in /mnt/pool.
Add these lines to the end of fstab make sure to leave a few blank lines as spacers
Code:
[FONT=monospace][COLOR=#000000]
/mnt/pool/TV /cloud/media/TV       none bind 0 0[/COLOR]
/mnt/pool/Films /cloud/media/Films none bind 0 0
/mnt/pool/Music /cloud/media/Music none bind 0 0[/FONT]
Save the file by pressing crtl and x then press y then enter.
See screenshot below

Configuring SSH-For Managing your server and uploading media
Now we need to configure ssh to listen on any address and disallow remote root login and enable the internal sftp server.
So fire up nano and edit your ssh config file with the following command.

Uncomment the lines for port and ip address like shown in the screenshot below.

Remove The Default Apache2 webpage-- for security.
then enter this in the address bar at the top and press enter
Delete index.html.You can now close pcmanfm and the new terminal.
So fire up nano and edit your ssh config file with the following command.
Code:
[FONT=monospace][COLOR=#000000]sudo nano /etc/ssh/sshd_config
[/COLOR][/FONT]
Uncomment the lines for port and ip address like shown in the screenshot below.
Find the line PermitRootLogin prohibit-password and change it to PermitRootLogin no
Find the line Subsystem sftp user/lib/openssh/sftp-server and change it to Subsystem sftp internal-sftp
like the screenshots below.


Save the file using ctrl and x then restart ssh
Find the line Subsystem sftp user/lib/openssh/sftp-server and change it to Subsystem sftp internal-sftp
like the screenshots below.
Save the file using ctrl and x then restart ssh
Code:
[COLOR=#000000][FONT=monospace]sudo systemctl restart ssh[/FONT][/COLOR]
Remove The Default Apache2 webpage-- for security.
Open a new terminal and switch to root
then open pcmanfm
Code:
[COLOR=#000000][FONT=monospace]su
[/FONT][/COLOR]
then open pcmanfm
Code:
[COLOR=#000000][FONT=monospace]pcmanfm
[/FONT][/COLOR]
then enter this in the address bar at the top and press enter
Code:
/var/www/html
Delete index.html.You can now close pcmanfm and the new terminal.
Installing PHP 7.3
Code:
[COLOR=#000000][FONT=monospace]<type>mysql</type> [/FONT][/COLOR][FONT=monospace]<host>Your-Server-Ip-Goes-Here<</host> [/FONT][FONT=monospace]<port>[/FONT][FONT=monospace]3306</port>[/FONT][COLOR=#000000][FONT=monospace] <user>Your-Kodi-MYSQL-Username-Goes-Here</user> [/FONT][/COLOR][COLOR=#000000][FONT=monospace]<pass>Your-Kodi-MYSQL-Password-Goes-Here</pass> [/FONT][/COLOR][COLOR=#000000][FONT=monospace]</musicdatabase> [/FONT][/COLOR][LEFT][COLOR=#000000][FONT=monospace] </advancedsettings> [/FONT][/COLOR]At the moment ownCloud 10.0.4 only supports PHP 7.3, were going to need to add a repository or two to install the right version of php and extensions needed by ownCloud. To do this simply enter the commands below into a terminal and apt will take care of the rest. During the process of adding the new repository apt will ask you if it is ok to add the repository press enter to add itNow we install PHP 7.3 using the command belowCode:[COLOR=#000000][FONT=monospace]sudo add-apt-repository ppa:ondrej/apache2 [/FONT][/COLOR][COLOR=#000000][FONT=monospace] sudo add-apt-repository ppa:ondrej/php [/FONT][/COLOR][COLOR=#000000][FONT=monospace]sudo apt update [/FONT][/COLOR][COLOR=#000000][FONT=monospace]sudo apt-get -y install software-properties-common [/FONT][/COLOR]Now we check to make sure version 7.3 of PHP was installed using the command below.Code:[COLOR=#000000][FONT=monospace]sudo apt -y install php7.3 [/FONT][/COLOR]If you see Version 7.3 your golden.Code:[COLOR=#000000][FONT=monospace]php -v [/FONT][/COLOR]Now we need to install all the extensions ownCloud will need by using the command below.
Code:[COLOR=#000000][FONT=monospace]sudo apt-get -y install apache2 libapache2-mod-php7.3 openssl php-imagick php7.3-common php7.3-curl php7.3-gd php7.3-imap php7.3-intl php7.3-json php7.3-ldap php7.3-mbstring php7.3-mysql php7.3-pgsql php-smbclient php-ssh2 php7.3-sqlite3 php7.3-xml php7.3-zip [/FONT][/COLOR]Installing ownCloud Part AFirstly go to the ownCloud website and download the latest version.https://owncloud.org/download/#owncloud-server-tar-ball Download the zip version and place it in your home directory. Unzip it with this command.Next were going to create a configuration file for the Apache web server use the command below to create your configuration file in the correct directory.Then change permissions of the var/www/owncloud directory so apache can use it with the command below.Code:[COLOR=#000000][FONT=monospace]sudo unzip /home/your-user-name-here/owncloud-10.4.1.zip -d /var/www [/FONT][/COLOR]Code:[COLOR=#000000][FONT=monospace]sudo chown -R www-data: /var/www/owncloud [/FONT][/COLOR]Paste the below code into nano with left shift and insertCode:[COLOR=#000000][FONT=monospace]sudo nano /etc/apache2/conf-available/owncloud.conf [/FONT][/COLOR]Press ctrl and x to save it and press enter to confirm. Enable the newly added configuration and all required Apache modules with the below commandsCode:[COLOR=#000000][FONT=monospace]Alias /owncloud "/var/www/owncloud/"[/FONT][/COLOR] [COLOR=#000000][FONT=monospace]<Directory /var/www/owncloud/>[/FONT][/COLOR][COLOR=#000000][FONT=monospace]Options +FollowSymlinks[/FONT][/COLOR][COLOR=#000000][FONT=monospace]AllowOverride All[/FONT][/COLOR] [COLOR=#000000][FONT=monospace]<IfModule mod_dav.c>[/FONT][/COLOR][COLOR=#000000][FONT=monospace]Dav off[/FONT][/COLOR][COLOR=#000000][FONT=monospace]</IfModule>[/FONT][/COLOR] [COLOR=#000000][FONT=monospace]SetEnv HOME /var/www/owncloud[/FONT][/COLOR][COLOR=#000000][FONT=monospace]SetEnv HTTP_HOME /var/www/owncloud[/FONT][/COLOR][COLOR=#000000][FONT=monospace]</Directory> [/FONT][/COLOR]then restart apacheCode:[COLOR=#000000][FONT=monospace]sudo a2enconf owncloud [/FONT][/COLOR][COLOR=#000000][FONT=monospace] sudo a2enmod rewrite [/FONT][/COLOR][COLOR=#000000][FONT=monospace] sudo a2enmod headers [/FONT][/COLOR][COLOR=#000000][FONT=monospace] sudo a2enmod env [/FONT][/COLOR][COLOR=#000000][FONT=monospace] sudo a2enmod dir [/FONT][/COLOR][COLOR=#000000][FONT=monospace] sudo a2enmod mime [/FONT][/COLOR]Code:[COLOR=#000000][FONT=monospace]sudo systemctl restart apache2 [/FONT][/COLOR]Configuring MYSQLNow were going to configure our mysql installation.Use the command below to open the mysql configuration file in nanoadd this line under the [mysqld] default-authentication-plugin=mysql_native_password, like in the screenshot below.Code:[COLOR=#000000][FONT=monospace]sudo nano /etc/mysql/mysql.conf.d/mysqld.cnf [/FONT][/COLOR]Find this line
Code:[COLOR=#000000][FONT=monospace]port = 3306 [/FONT][/COLOR]And uncomment the line by removeing the # like the screenshot below.Then find this line
And change it to 0.0.0.0 like the screenshot below.Code:bind-address = 127.0.0.1And comment it out using a # at the start of the line like the screenshot below.Code:[COLOR=#000000][FONT=monospace]max_binlog_size = 100M [/FONT][/COLOR]Then restart the mysql server using the below command
Code:[COLOR=#000000][FONT=monospace]sudo systemctl restart mysql [/FONT][/COLOR]Create The ownCloud MYSQL User & DatabaseNow has come the time to create the owncloud mysql user and database. There are Two ways you can do this 1. (the preferred Method) Ive wrote a few scripts that will automate the process as much as possible. 2. (messy but if you want to learn its the best route) you can do it the Manual way. Using The Scripts. You’ll need to hop over to git hub to download my scirpts the (M.O.K.E Toolkit)My OwnCloud and Kodi Essentials Toolkitextract the zip and follow the readme’s Open M.O.K.E-Toolkit-1.0 Folder Open ownCloud Folder Read the Readme The Manual Way. Start off by logging into the mysql server using the below command.Code:[URL="https://github.com/y700/M.O.K.E-Toolkit"][COLOR=#000000][FONT=monospace]https://github.com/y700/M.O.K.E-Toolkit[/FONT][/COLOR][/URL]Code:[COLOR=#000000][FONT=monospace]sudo mysql -u root -p [/FONT][/COLOR]Enter your root password then using the below commands create your owncloud mysql username password and database. (change username and password to the user name and password you want owncloud to use when connecting to the mysql server.Code:[COLOR=#000000][FONT=monospace]CREATE USER 'username'@'localhost' IDENTIFIED WITH mysql_native_password BY 'password'; [/FONT][/COLOR]Code:[COLOR=#000000][FONT=monospace]CREATE DATABASE cloud;[/FONT][/COLOR]Code:[COLOR=#000000][FONT=monospace]GRANT ALL PRIVILEGES ON cloud.* TO 'username'@'localhost' WITH[/FONT][/COLOR][COLOR=#000000][FONT=monospace]GRANT OPTION; [/FONT][/COLOR]Then type exit and press enterCode:[COLOR=#000000][FONT=monospace]FLUSH PRIVILEGES; [/FONT][/COLOR]Installing ownCloud Part BNow its time install ownCloud, Open up your web browser and go to the following urlYou’ll be presented by the owncloud welcome screen see screenshot below.Code:[COLOR=#000000][FONT=monospace]your-server-ip/owncloud [/FONT][/COLOR]Enter the username and password you would like to use with ownCloud. Click on “Storage and Database” and select the “Mysql/MariaDB” option. Enter your ownCloud Mysql database username and password. And the ownCloud database name. enter localhost:3306 for host and port information. Then click on “Finish Setup”
ownCloud will now install itself and configure the database as necessary. This will take some time once its finished you will be presented with your ownCloud home screen like the screenshot below.
Log in and you will be taken to your main dashboard like the screenshot below.
 Now its time to configure owncloud to let you mount your local storage. We need to go to our terminal and use the following command to change to the ownCloud configuration directory.then we edit the configuration php using the below command.Code:[COLOR=#000000][FONT=monospace]cd /var/www/owncloud/config [/FONT][/COLOR]Find this lineCode:[COLOR=#000000][FONT=monospace]sudo nano config.php [/FONT][/COLOR]add a new line below it and add on the new line add.Code:[COLOR=#000000][FONT=monospace]'datadirectory' => '/var/www/owncloud/data', [/FONT][/COLOR]like the screenshot belowCode:[COLOR=#000000][FONT=monospace]'files_external_allow_create_new_local' => 'true', [/FONT][/COLOR]
Press ctrl and x to save and press enter to confirm.
then restart Apache.open up your web browser and go to your ownCloud page. Log in and go to your settings page. See screenshots belowCode:[COLOR=#000000][FONT=monospace]sudo systemctl restart apache2 [/FONT][/COLOR]Go to the admin pane on the bottom left of the settings page and click on storage. Click the check box for enabling external storage.See screenshot below. Click on add storage and select local from the drop down list see screenshot below.
 In the configuration box put.In folder name putCode:[COLOR=#000000][FONT=monospace]/cloud/media/ [/FONT][/COLOR]Click the gear icon and click the read only check box see screenshot below.Code:[COLOR=#000000][FONT=monospace]Media [/FONT][/COLOR]
Now go back to your ownCloud home screen now you will see your media folder there see screenshot below.
Next we need to create a user account that we will use to access our media. Go to your username and click on users it will bring up the user manager for ownCloud. See screenshot below.
Fill in the username and email address and click on groups. Then add new group. Enter the group name and press enter. Then press create you should see your user has been created like the screenshot below.
Click on the password box to set a password for your account ignore any warnings about sending reset emails as we haven't set up a email address for ownCloud to send emails from see screenshot below.
That's ownCloud Installed and set up.
Getting ownCloud To scan for any new files or changes to any existing files.now we must get ownCloud to scan for any changes.Change to your ownCloud Directory using the command below.See Screenshot below.Code:[COLOR=#000000][FONT=monospace]cd /var/www/owncloud [/FONT][/COLOR]Then run the command below to get ownCloud to scan for any new files or changes to existing files.
See screenshot below.Code:[COLOR=#000000][FONT=monospace]sudo -u www-data php occ files:scan your-username-goes-here [/FONT][/COLOR]When its finished scanning you will get a message like in the screenshot below.
You Must DO this Every time you add or change a file your sharing with ownCloud.
Im working on a cron job that will automate this I will post an update when I have a working cron job.Creating a MYSQL User for KodiNow were going to need something to watch our media on. Team XBMC have created a media Center aplication called Kodi. The Stock install of Kodi is perfectly legal and suits our needs perfectly. There are two ways of doing this. 1. (the preferred Method) M.O.K.E Toolkit 2.(good if your learning) The manual way. M.O.K.E Toolkit Open the M.O.K.E-Toolkit-1.0/Kodi-Mysql-Database-Scripts/ Folder Open the create-user Folder Read the Readme Manual Way Open up a terminal and log into your mysql server using the below command.enter your mysql root password and press enter enter the below commands into the mysql prompt replacing username-goes-here and password-goes-here for the kodi mysql username and password (please use different username and password from your ownCloud username and password)Code:[COLOR=#000000][FONT=monospace]sudo mysql -u root -p [/FONT][/COLOR]Code:[COLOR=#000000][FONT=monospace]CREATE USER 'user-name-goes-here'@'%' IDENTIFIED WITH mysql_native_password BY 'password-goes-here' ; [/FONT][/COLOR]Code:[LEFT][COLOR=#000000][FONT=monospace] <advancedsettings> [/FONT][/COLOR][COLOR=#000000][FONT=monospace] <videodatabase> [/FONT][/COLOR][COLOR=#000000][FONT=monospace] <type>mysql</type>[/FONT][/COLOR][COLOR=#000000][FONT=monospace] <host>Your-Server-Ip-Goes-Here</host> [/FONT][/COLOR][COLOR=#000000][FONT=monospace] <port>3306</port> [/FONT][/COLOR][COLOR=#000000][FONT=monospace] <user>Your-Kodi-MYSQL-Username-Goes-Here</user> [/FONT][/COLOR][COLOR=#000000][FONT=monospace] <pass>Your-Kodi-MYSQL-Password-Goes-Here</pass> [/FONT][/COLOR][COLOR=#000000][FONT=monospace] </videodatabase> [/FONT][/COLOR]Code:[COLOR=#000000][FONT=monospace]GRANT ALL ON *. * TO 'username-goes-here'@'%';[/FONT][/COLOR]Were now going to make the kodi advanced settings.xml using kate or another text edditor. The advanced settings file will instruct kodi to connect to our mysql database and store its library information and watched status in our database instead of the internal kodi database. Open kate and copy the below code into your text editor and save it asCode:[COLOR=#000000][FONT=monospace]FLUSH PRIVILEGES; [/FONT][/COLOR]Code:[COLOR=#000000][FONT=monospace]advancedsettings.xml [/FONT][/COLOR]Code:<musicdatabase>

Now add .mp3 to the end of your file name so your advanced settings filename reads like this
Code:
[COLOR=#000000][FONT=monospace]advancedsettings.xml.mp3
[/FONT][/COLOR]
It will make it easy to import it into kodi.
Importing advancedsettings.xml into Koidi
Move your advancedsettings.xml.mp3 file to your home directory.
Open kodi and go to the settings menu and click on file manager see screenshot below.
In the right hand pane select Profile directory see screenshot below.

In the left pane select add source see screenshot below.

Click browse see screenshot below.
Select your home folder see screenshot below.


In the left pane select add source see screenshot below.
Click browse see screenshot below.
Select your home folder see screenshot below.
You will find yourself back at the file manager in the left pane select your home folder see screenshot below.

Find your advancedsettings.xml.mp3 file and right click the file and select copy see screenshot below.

on the right pane select the advancedsettings.xml.mp3
and right click and select rename it to advancedsettings.xml
and click ok see screenshots below.


Now you can exit the file manager and restart kodi.
It will now connect to your mysql server and use it for all its library information storage including watched status's.
Adding Media To Kodi
Firstly go to your own cloud home page and log in using your media account not your admin account.
In the bottom left of the page you should see an option "Settings" click it it will bring up the webdav address we will need for kodi to connect to ownCloud see screenshot below.

Copy the address it has given you, it will look something like this.
You can now close your web browser and open Kodi.
Once kodi has loaded you will be shown a screen like the one below.

Click on the gear icon you will find yourself in the settings menu see screenshot below.

[/LEFT]
Find your advancedsettings.xml.mp3 file and right click the file and select copy see screenshot below.
on the right pane select the advancedsettings.xml.mp3
and right click and select rename it to advancedsettings.xml
and click ok see screenshots below.
Now you can exit the file manager and restart kodi.
It will now connect to your mysql server and use it for all its library information storage including watched status's.
Adding Media To Kodi
Firstly go to your own cloud home page and log in using your media account not your admin account.
In the bottom left of the page you should see an option "Settings" click it it will bring up the webdav address we will need for kodi to connect to ownCloud see screenshot below.
Copy the address it has given you, it will look something like this.
Code:
[COLOR=#000000][FONT=monospace]http://some-ip-here/owncloud/remote.php/dav/files/Your-Username/
[/FONT][/COLOR]
You can now close your web browser and open Kodi.
Once kodi has loaded you will be shown a screen like the one below.
Click on the gear icon you will find yourself in the settings menu see screenshot below.
Click on Media and you will be in the media settings sub menu see screenshot below.

In the manage sources catagory click on videos and you will be taken to the add sources menu see screenshot below.

Click on add videos you will then be asked to add a video source see screenshot below.

Click on browse you will be asked to browse for a new share see screenshot below.

In the manage sources catagory click on videos and you will be taken to the add sources menu see screenshot below.
Click on add videos you will then be asked to add a video source see screenshot below.
Click on browse you will be asked to browse for a new share see screenshot below.
Click Add network location and you will be asked to add a network location.
Click the down arrow next to smb untill you get to WebDAV server (http).
You will be asked to fill in the;
Server Adress
Remote Path
port
Username
Password
for me it would look something like this
server address: 192.168.0.2
remote path: owncloud/remote.php/dav/files/yoda
port: 80
username: yoda
password: bla bla bla bla
Click connect and you will see your network share has been added to the list of shares see screenshot below.

Click on your dav share and select media see screenshot below.

Select TV or Films then press ok
You will see the video source information has been filled out
Press ok and you will be prompted to set what type of content it is.

For TV select TV shows for Films Select Movies
select your information provider and press ok see screenshots below.


You will be asked if you want to refresh all information within this path press yes see screenshot below.

kodi will now scan your TV or Films to its libary.
Repeat the procedure for Films or TV.
Go back to the settings menu and select the option for update libary on start up see screenshot below

Now Kodi will check for new media upon startup.
Once your media has finished scanning in your free to sit back and enjoy a film.
I hope you have found this tutorial and my scripts useful.
If you have any questions please feel free to get in touch.
All The Best, Yoda
Click on your dav share and select media see screenshot below.
Select TV or Films then press ok
You will see the video source information has been filled out
Press ok and you will be prompted to set what type of content it is.
For TV select TV shows for Films Select Movies
select your information provider and press ok see screenshots below.
You will be asked if you want to refresh all information within this path press yes see screenshot below.
kodi will now scan your TV or Films to its libary.
Repeat the procedure for Films or TV.
Go back to the settings menu and select the option for update libary on start up see screenshot below
Now Kodi will check for new media upon startup.
Once your media has finished scanning in your free to sit back and enjoy a film.
I hope you have found this tutorial and my scripts useful.
If you have any questions please feel free to get in touch.
All The Best, Yoda